

An Application Activators Patch - congratulate, what
5 Activating Applied Patches in Your Installations and Applications
This section includes the following topics:
Overview
After you download and apply patches that contain classes to be loaded into a classpath, such as the WebLogic system classpath or the classpath of an application deployed on WebLogic Server, you must ensure that those classes are properly inserted into the appropriate classpath; otherwise they do not take effect. Likewise, if a patch contains library files to be inserted into the library path, you must ensure that the paths for those files are properly handled when the server instances or applications by which they are used are started.
Smart Update does not use a single method to apply all patches to a product installation; the method used depends on the type of patch and its contents. Patches may contain any of the following:
Replacements for resources within a product installation
Class files that can be used by a classloading mechanism, such as a classpath and files in an extension directory
Library files that can be included in a library path
Patches that contain library files may not necessarily replace existing files in the target installation. Therefore they must be loaded explicitly by a start script.
Shared archives that must be deployed and referenced by applications
Patch JAR files that update entities referred to as modules
Review the following sections to learn how patches are applied and how Smart Update organizes those patches on your system. Understanding these processes is necessary to determine whether and how your start scripts are to be modified:
This section also introduces the basic tasks that you must perform to ensure that the patches you apply to your domains become effective:
Patches That Must Be Referenced By Start Scripts
If a patch contains class or library files that are loaded by a start script, those classes or files are stored, by Smart Update, in a central, installation-level patch directory on the system. These classes and library files are then available for loading when the WebLogic Server instances by which they are used are started.
Examples of patches in this category are those that contain the following:
Class files that are loaded into the WebLogic Server system classpath
Class files that are loaded into the classpath of an application that is deployed on WebLogic Server
Library files that are loaded into the library path for WebLogic Server
Note:
Although a patch may be validated and applied to a target installation at any time, some patches do not become effective immediately. Any patch that contains either (a) classes to be loaded into a classpath, or (b) native library files to be loaded into a library path, does not become effective until you (a) modify the appropriate domain or server start scripts, if necessary, so they point to the patch and (b) restart the corresponding domains or servers.
Patches That Replace Resources For All Applications, Domains, and Servers
Patches that replace existing resources in a product installation become effective, automatically, throughout the installation, as soon as they are applied; they are not enabled by a start script. Therefore, you do not need to change start scripts for patches that contain replacements for system resources.
Examples of patches that typically contain replacement artifacts include the following:
Resources for Web server plug-ins
Socket multiplexers
Dynamically linked libraries
Note:
Smart Update stores files that have been replaced in the backup subdirectory of the installation-level patch directory. If you subsequently remove the patch in which a replacement was delivered, the original resource is restored from backup. (For details about backup, see Table 5-1.) For optimal security, however, it is recommended that you create a backup of any system resource that you plan to replace before applying the patch that replaces it.
Patches That Must Be Deployed and Referenced By Applications
Shared archive patches must be explicitly deployed and referenced by applications that require them. If a Shared Archive patch is to be applied to selected applications and not all applications, you must create a custom patch profile for each unique patch level.
How Patch Files Are Stored on Your System By Smart Update
When you download a patch or patch set from My Oracle Support, a patch container is placed in the patch download directory. A patch container holds the following:
A patch or patch set
A patch may contain several files. These files may include:
Classes delivered as replacements for classes, with the same name, that are inserted into the WebLogic system classpath at server start time
Native library files to be inserted into the system path
Configuration files
A patch set is a collection of two or more individual patches, each with its own set of files.
Metadata about each patch in the patch container
Metadata is information used by Smart Update to validate each patch against all other patches applied to the same product installation. (When you apply a patch, metadata is placed in a patch registry in a directory on your system that is maintained by Smart Update. For details, see Structure of the Installation-Level Patch Directories.)
When you apply a patch to a given patch profile, each file in the patch is handled as follows:
If the patch contains a replacement for a system resource, such as a WebLogic Server plug-in module, the existing resource is automatically updated with the replacement.
If the patch contains a patch JAR file, that is, a set of classes to be loaded into a classpath as updates for existing classes with the same names in the target installation, the following events occur:
The patch JAR file is placed in the installation-level patch directory. For a description of this directory, see Structure of the Installation-Level Patch Directories.
Smart Update creates a file, called the patch manifest JAR, which contains pointers to the classes in the patch JAR file. If a patch manifest JAR for the current profile exists, it is updated with pointers to the classes in the patch JAR file. The patch manifest JAR file is described in Patch Manifest JAR Files.
If the patch contains native library files to be loaded into the system library path, through either the or environment variable, Smart Update Verifies the existence of a subdirectory called that is specific to the currently selected patch profile. If Smart Update does not find such a subdirectory, it creates one. For a description of the subdirectory, see Open Start Script Dialog Box Icons.
Structure of the Installation-Level Patch Directories
After you install the products and run Smart Update, the patch directories are created. Each product (for example, WebLogic Server, Workshop for WebLogic, WebLogic Integration, and WebLogic Portal) has its own patch directory structure (for example, , , , and ) under the middleware home directory.
The product-specific patch directory structure provides clean demarcation of patch maintenance on a product basis. It also provides more flexibility for future products to interoperate with separate or common versions of WebLogic Server.
Figure 5-1 shows the structure of the directories.
Note:
Starting from the Oracle Fusion Middleware 11gR1 release, MW_HOME is the new term for BEA_HOME.Table 5-1 describes the contents of each patch directory.
Table 5-1 Directories and Files in the Installation-Level Patch Directory
| This directory | Contains |
|---|---|
patch_product\backup | Contains the patch backup manifest, which includes files and information required to restore an earlier patch level on your system. This directory is created when you apply an installation-wide patch that contains files to be placed in the product installation directory. |
patch_product\patch_jars | Patch JAR files, under each product patch directory (for example, and as shown in Figure 5-1), contain the class JAR files from patches that have been applied to the product installation on the system. A patch JAR file under each product patch directory may contain one or more of the following:
Note: Patch JAR files containing replacements for system resources are not stored in this directory (). Note: It is good practice to ensure that your system contains enough disk space for the patch JAR files being added. For information about the size of a patch containing a JAR file, see Viewing Patch Information. |
patch_product\profiles\default | Directory for the default patch profile. When you apply a patch, one or more of the following subdirectories may be created:
|
patch_product\profiles\custom-profile-name | Directory for a custom patch profile. The directory takes the name of the custom patch profile. For every custom patch profile created, a directory named for the profile is created automatically. Each custom patch profile directory may contain one or more of the following subdirectories:
|
patch_product\registry | Contains information about:
This information is used internally by Smart Update to perform tasks such as patch validation. |
Patch Manifest JAR Files
Note:
Starting from the Oracle Fusion Middleware 11gR1 release, MW_HOME is the new term for BEA_HOME.Patches that contain classes that supersede existing, same-named classes when they are inserted into a classpath are referenced by a patch manifest JAR. When you apply a patch that contains such classes to a patch profile, the patch manifest JAR file of that profile is automatically updated by Smart Update to reference the classes in the patch.
For example, if a patch contains a JAR file called , which contains WebLogic system-level classes, and that patch is applied to the default patch profile, Smart Update performs the following tasks:
Adds to the directory.
Creates the following file, if it does not exist already:
BEA_HOME\patch_wls1001\profiles\default\sys_manifest_classpath\weblogic_patch.jarIn , adds the following reference to the WebLogic system classes in CR99004.jar:
Class-Path: C:\Oracle\Middleware\patch_wls1001\patch_jars\CR99004.jarUpdates the patch registry information in the directory.
Native Library Files
Note:
Starting from the Oracle Fusion Middleware 11gR1 release, MW_HOME is the new term for BEA_HOME.If a patch contains native library files that are to be loaded into the system library path when the corresponding WebLogic Server instance is started, those library files are stored in the subdirectory for the patch profile to which the patch has been applied.
For example, if the patch contains the file , which is to be loaded into the system library path when the server is started, and the patch is applied to the default patch profile, Smart Update does the following:
Creates the following directory, if it does not exist already:
BEA_HOME\patch_wls1001\profiles\default\nativePuts in the following directory:
BEA_HOME\patch_wls1001\profiles\default\nativeUpdates the patch registry information maintained in the following directory:
BEA_HOME\patch_wls1001\registry
Module Patch Files
Note:
Starting from the Oracle Fusion Middleware 11gR1 release, MW_HOME is the new term for BEA_HOME.When a module patch is applied, whether it is a common module patch or product-specific module patch, Smart Update adds the patch to the directory. The original module JAR file is not modified. This approach is implemented to limit the scope of applied patch.
For example, if a module patch for WebLogic Event Server contains updated classes to , and that patch is applied to the default patch profile, Smart Update performs the following tasks:
Creates the following directory, if it does not exist already:
BEA_HOME\patch_wlevs20200\profiles\default\modulesAdds the updated in the directory
Updates the patch registry information in the directory.
When WebLogic Event Server starts, it uses the patched module located in the instead of using the original module that still exists in the directory.
Classpath, Extended Classpath, and Native Library Patches
You can assume that your classpath and library path patches are picked up properly when the domain servers are started, without your having to modify any start scripts, if:
Your WebLogic domains use the default scripts generated by the Configuration Wizard for starting the Oracle product server instances configured for those domains.
You do not need to limit the scope of a patch to a specific domain or server instance.
Under other conditions, however, you must take additional steps to ensure that patches are inserted into the appropriate classpath or library path when the product servers are started. These additional steps are necessary if the environment in which you have applied patches to the products matches either of the following:
To start the servers in your WebLogic domains, you use custom scripts that do not invoke the default script:
Windows:
WL_HOME\common\bin\commEnv.cmdUNIX:
WL_HOME/common/bin/commEnv.shYou need to limit the scope of a patch or patch set to a specific domain or server, instead of applying it universally to all domains and servers that run on a particular product installation.
This section provides information on the use of scripts, how to modify start scripts using the Smart Update Start Script Editor, and describes custom scripts that you can use to point all domains and servers at patches of classpath, extended classpath, and native library files.
Note:
Workshop for WebLogic (10.1 and later releases) does not enable run-time WebLogic Server patches automatically. After applying patches by using Smart Update, you must also specify the patch profile for the run-time WebLogic Server in the Workshop IDE. For more information, see the Workshop for WebLogic documentation.About Pointing Start Scripts at Patches
To ensure that a patch is loaded into a classpath or the system library path when a WebLogic Server instance is started, you might need to add a pointer to the patch to the start script for that server. The following sections explain how Smart Update works and describe the changes that you might need to make to your start scripts:
Default Script that Defines Class and Library Paths for All Domains and Servers
When a WebLogic Server instance is started, several startup scripts are executed. One of the tasks performed by these scripts is to define class and library paths used by the system, including the WebLogic system classpath. By default, all WebLogic Server instances use the class and library path definitions set in one of the following scripts:
Windows:
WL_HOME\common\bin\commEnv.cmdUNIX:
WL_HOME/common/bin/commEnv.shNote:
In UNIX environments, if you want to run manually from the command line or invoke it from a custom server startup script, you must use the following syntax:or
(if you are already located in the bin directory)
Default Patch Path Environment Variables
The script includes default definitions for the environment variables described in Table 5-2. By default, these patch path variables are in effect for every WebLogic Server instance that is started, and they point at patches that are to be inserted into class and library paths.
Table 5-2 Patch Path Variables Defined in the commEnv Script
| This variable | Is set to the location of |
|---|---|
PATCH_CLASSPATH | The patch manifest JAR file for the default patch profile ()—This JAR file contains references to classes in the patch JAR files to be loaded into the WebLogic system classpath. For example, the default definition in the script for Windows is specified as follows: if "%PATCH_CLASSPATH%" == "" set PATCH_CLASSPATH= %WLS_PATCH_CLASSPATH%;%WLW_PATCH_CLASSPATH%Note: Most patches provided by My Oracle Support are WebLogic system classpath patches referenced by . |
WEBLOGIC_EXTENSION_DIRS | The WebLogic extension directory patch manifest JAR file for the default patch profile ()—This file contains references to classes in the patch JAR files to be loaded into the classpath of an application deployed on WebLogic Server. For example, the default definition in the script for Windows is specified as follows: if "%WEBLOGIC_EXTENSION_DIRS%" == "" set WEBLOGIC_EXTENSION_DIRS= %BEA_HOME%\ patch_wls1030\profiles\default\sysext_manifest_classpathNote: This variable is reserved for use by products that require the classes in a patch JAR file to be loaded into the classpath of an application that is deployed on WebLogic Server. Currently, this mechanism for patching deployed applications is not used with WebLogic Server 9.1. |
PATCH_LIBPATH (UNIX only) | The folder in the installation-level directory for the default patch profile—This foler contains files to be loaded into the system library path through the environment variable. For example, the default definition in the script for UNIX is specified as follows: if [ "${PATCH_LIBPATH}" = "" ]; then PATCH_LIBPATH=${BEA_HOME} /patch_wls1030/profiles/default/native |
PATCH_PATH (Windows only) | The native folder in the installation-level patch directory for the default patch profile—This folder contains files to be loaded into the system path through the environment variable. For example, the default definition in the script for Windows is specified as follows: if "%PATCH_PATH%" == "" set PATCH_PATH= %BEA_HOME%\patch_wls1030\profiles\default\native |
How Patch Path Variables Are Inserted into Class and Library Paths
Within the script, the patch path variables described in Table 5-2 are inserted into statements that set the system classpath, library path, and so on, as appropriate. For example, the following default statement in the script sets the WebLogic system classpath. The variable , at the beginning of the classpath definition, is shown in bold.
set WEBLOGIC_CLASSPATH=%PATCH_CLASSPATH%;%JAVA_HOME%\lib\tools.jar; %WL_HOME%\server\lib\weblogic_sp.jar;%WL_HOME%\server\lib\weblogic.jar; %WL_HOME%\server\lib\webservices.jarWhen the script is executed at server start time, the classes and library files referenced by these patch path variables are loaded, overriding any classes or library files of the same name that are listed later in the classpath or path statement.
Figure 5-2 shows a patch JAR file that contains classes referenced through the environment variable and loaded into the WebLogic system classpath by the script.
About Setting a Patch Path Variable in a Server Start Script
If the patch path variables described in Default Script that Defines Class and Library Paths for All Domains and Servers were defined in a script, such as or , that you executed earlier to start instances of WebLogic Server, the existing definitions for those server instances are retained; they are not overridden by the variable definitions in .
For example, if the script for the MyTestDomain domain contains a definition for the variable that is used by all WebLogic Server instances in MyTestDomain, the definition of in the script is overridden for those server instances. For this reason, it is important that if you add a patch path variable definition to a start script, that the definition is placed before the statement that invokes another start script.
It is important for each WebLogic Server instance to start properly with any required patches. If your environment requires you to define one of the patch path variables with which you start your WebLogic Server instances, you must understand the following:
Sequence in Which Start Scripts Are Executed
After you understand the sequence in which the start scripts in your environment are executed, and the locations from which start scripts are invoked, you can determine the script that must be changed and ensure that the correct values are assigned to all required patch path variables for all target server instances.
A default set of scripts are provided to start WebLogic Server instances and to set variables for each domain and the Oracle product installation.
These scripts are executed in a specific order, which is determined by the content of each script.
Table 5-3 identifies:
The default set of scripts that are created for a server, domain, and product installation
The function of each script
The order in which the scripts are executed
Table 5-3 Default Set of Scripts in a Product Installation
| This script | Performs this function | When Executed |
|---|---|---|
In the directory of your domain: Windows: startManagedWebLogic.cmdUNIX: startManagedWebLogic.sh | Starts Managed Servers in the domain. Patch path variables defined in this script are used by all Managed Servers started by the script. | When a domain is configured with Managed Servers, such as in a cluster, this script is the first one executed by default. This script invokes the script. |
In the directory of your domain: Windows: startWebLogic.cmdUNIX: startWebLogic.sh | Starts WebLogic Server instances in a domain. Patch path variables defined in this script are in effect for all domain servers except for those that are started. For example, if the previously-executed script contains patch path variable definitions for Managed Servers, then the patch path variable definitions appearing in the script are overridden for Managed Servers started by the script. | If the domain is configured with Managed Servers, this script is invoked, by default, by the script. The script invokes the script. |
In the directory of your domain: Windows: setDomainEnv.cmdUNIX: setDomainEnv.sh | Sets domain-wide environment for starting and running WebLogic Server instances. Patch path variables defined in this script are in effect for all domain servers not otherwise started by the script, script, or other server-specific script. | By default, this script is invoked by the script. The script contains an invocation to the script to define settings for the domain that are not otherwise defined in the server start scripts or in the script. |
In the directory of your installation: Windows: commEnv.cmdUNIX: commEnv.sh | Sets domain-wide environment for starting and running WebLogic Server instances. Patch path variables defined in this script are in effect for all domain servers not otherwise started by the script, script, or other server-specific script. | By default, this is the final script that is invoked to define settings for servers that are started and that run on the installation. Note: In UNIX environments, if you want to run manually from the command line or invoke it from a custom server startup script, you must use the following syntax: . WL_HOME/common/bin/commEnv.shor, if you are already located in the bin directory: . ./commEnv.sh |
Placeholders for Defining Patch Path Variables in Default Scripts
When you create a domain using the Configuration Wizard, note the following about the placeholders for defining patch path variables in the scripts that are created for that domain:
The script contains the following lines, which are commented out by default:
@REM If you want to override the default Patch Classpath, Library Path and Path for this domain, @REM Uncomment the following lines and add a valid value for the environment variables @REM set PATCH_CLASSPATH=[myPatchClasspath] (windows) @REM set PATCH_LIBPATH=[myPatchLibpath] (windows) @REM set PATCH_PATH=[myPatchPath] (windows) @REM PATCH_CLASSPATH=[myPatchClasspath] (unix) @REM PATCH_LIBPATH=[myPatchLibpath] (unix) @REM PATCH_PATH=[myPatchPath] (unix)The Configuration Wizard provides these commented lines as an aid to helping you place definitions for patch path variables. For example, if you want to point the domain to the patch JARs in the custom profile MyProfile, you might uncomment the placeholder for the variable and define it as follows:
PATCH_CLASSPATH=%BEA_HOME%\patch_wls1001\profiles\MyProfile\sys_manifest_classpath\weblogic_patch.jarRefer to Table 5-2 for the definitions of these variables that are included by default in the script.
To help with adding definitions of patch path variables, Smart Update provides the Start Script Editor, described in Using the Start Script Editor.
Note:
A start script should reference no more than one patch manifest JAR file for WebLogic system-level classes. If a start script references more than one such file, unpredictable behavior may occur at run time.The and start scripts produced by the Configuration Wizard do not contain placeholders for defining patch path variables. If you add a definition for one or more of these variables to one of these scripts, be sure that you understand which WebLogic Server instances are affected.
By minimizing the number of start scripts to which you add patch path variable definitions, you reduce the amount of maintenance required for those scripts if you change or upgrade the maintenance level or version of the product software installed.
Modifying a Start Script
The specific tasks you must perform to ensure that a start script references the classes or library files patches in a profile depend on whether the scope of those patches is intended for all domains, and servers running on the product installation, or only for a specific domain, or server in that installation.
If you use custom start scripts, or if you need to limit the scope of a patch to a specific domain, server, you must modify your start scripts as follows:
To insert patches into the system classpath or library path for all server instances that run on a product installation, if you use custom start scripts, you must add references to the default patch profile to those scripts.
To limit the scope of a patch to a specific domain, or server, you must perform two tasks:
Create a custom patch profile, to which the patches are applied for the domain, or server that runs on a product installation.
In the start script(s) for the corresponding domain or server, add references to the custom patch profile.
To learn how to modify start scripts so that the class and library path patches you have applied are properly used, see Overview, which provides the following information:
The distinction between patch files that must be dynamically loaded into the system classpath or library path and patches that are automatically in effect installation-wide
Where, on your system, Smart Update places patch file content when you apply a patch
See also About Pointing Start Scripts at Patches, to find out how the default scripts created by the Configuration Wizard automatically insert class and library patches into the system classpath and library path. Understanding this process is important if you need to change your scripts so that they reference class and library patches appropriately.
You must modify your scripts in the following situations:
You do not use the default scripts in your environment.
You need to limit the scope of a patch to a particular domain or server start script.
Table 5-4 provides information about changing a start script.
Table 5-4 Changing Start Scripts
Using the Start Script Editor
The Start Script Editor is a tool, provided by Smart Update, for locating start scripts in your environment and creating definitions for patch path variables in them. Smart Update maintains scripts in multi-product environments with different patch levels as expressed in combinations of default patch profile and custom patch profiles.
Accordingly, in the bottom pane, the script snippet shown is also product-specific, and targets myCustomProfile. A different snippet is provided for each type of path. These paths include classpath, WebLogic extended classpath, and native.
Note:
Starting from the Oracle Fusion Middleware 11gR1 release, MW_HOME is the new term for BEA_HOME.Script Snippet for Windows
SET PATCH_CLASSPATH=%BEA_HOME%\patch_wls1001\profiles\myCustomProfile\sys_manifest_classpath\weblogic_patch.jar SET WEBLOGIC_EXTENSION_DIRS=%BEA_HOME%\patch_wls1001\profiles\myCustomProfile\sysext_manifest_classpath SET PATCH_LIBPATH=%BEA_HOME%\patch_wls1001\profiles\myCustomProfile\native SET PATCH_PATH=%BEA_HOME%\patch_wls1001\profiles\myCustomProfile\nativeScript Snippet for UNIX
export PATCH_CLASSPATH=${BEA_HOME}/patch_wls1001/profiles/myCustomProfile/sys_manifest_classpath/weblogic_patch.jar export WEBLOGIC_EXTENSION_DIRS=${BEA_HOME}/patch_wls1001/profiles/myCustomProfile/sysext_manifest_classpath export PATCH_LIBPATH=${BEA_HOME}/patch_wls1001/profiles/myCustomProfile/native export PATCH_PATH=${BEA_HOME}/patch_wls1001/profiles/myCustomProfile/nativeThis procedure describes the steps for using the Start Script Editor for WebLogic Platform 9.x, ALSB 2.5, and ALSB 2.6. To use the Start Script Editor, complete the following steps:
In Smart Update, select a target installation from the Target Installation panel.
Choose Patches > Start Script Editor.
In the Start Script Editor dialog box:
Choose the patch profile to which the domain or server will point. For information about using a custom patch profile to scope a patch to a specific domain or server, see Chapter 9, "Best Practices for Distributing Maintenance Updates."
Choose the product for which you are editing a start script. See Figure 5-3.
Note:
If you select Workshop for WebLogic, your domain does not automatically download any of the WebLogic Server patches that might exist in that custom profile.Open the start script you want to modify.
For detailed instructions, see Opening a Start Script.
Add the appropriate patch path variable definition to your patch profile.
The Start Script Editor provides code snippets with suggested definitions for the , , , and variables, all of which are customized for the previously-selected patch profile. You may want to modify these definitions, however, depending on your needs:
If your custom patch profile contains both WebLogic Server and Workshop for WebLogic patches, and you want all of them to be active in a specific domain, you must first edit the domain start script to include a product-specific tokenized path declaration, similar to the snippets, but modeled on the declarations in :
For example:
WLS_PATCH_CLASSPATH= and WLW_PATCH_CLASSPATH=instead of:
PATCH_CLASSPATH=You must also include a concatenation statement similar to the one found in :
set PATCH_CLASSPATH=%WLS_PATCH_CLASSPATH%;%WLW_PATCH_CLASSPATH%Repeat this for each path type.
Save the start script.
Note:
When adding a definition of a patch path variable to a start script, ensure that the definition appears before any statement that invokes another start script. For example, if you add a patch path variable definition to the setDomainEnv script, add it before the statement that invokes the commEnv script. This placement ensures that the definition you add is not overridden by a definition appearing in any of the start scripts that are subsequently invoked.
Smart Update does not enforce or control how you modify start scripts. If, however, you use the start scripts that are created by default by standard tools such as the Configuration Wizard, and maintain them in the default locations determined by those tools, Smart Update can provide a more structured and predictable way to locate the appropriate start scripts that must be modified for the purposes of pointing to the patches in a patch profile.
The Start Script Editor dialog box is not a wizard; it does not perform the following tasks:
Detect all appropriate scripts that must be modified. If you use the start scripts provided, by default, by the Configuration Wizard, the Start Script Editor can help you find them quickly.
If you have customized your server and domain start mechanisms, you might need to take additional steps beyond working with the Start Script Editor to make all the necessary changes.
Modify start scripts. The Start Script Editor displays scripts and suggests additions to them, but you make the final decisions about which modifications to make and where to save them.
Create backup copies of your start scripts.
Opening a Start Script
When you open a start script, by clicking Open in the Start Script Editor dialog box, Smart Update displays the Open Start Script dialog box. Use this dialog to locate the start script in which you want to add pointers from a domain, Managed Servers, a cluster, or an individual server to the patches in a patch profile.
In the Start Script Editor dialog box, the icons described in Table 5-5 are used to guide you to the directory containing the start script you want to modify.
Table 5-5 Open Start Script Dialog Box Icons
| This icon | Marks |
|---|---|
The parent directory, within a domain, of the bin subdirectory in which, by default, the scripts you need to change reside. | |
A domain subdirectory, such as bin, in which script files reside. To open a subdirectory and display the scripts in it, click this icon. |
If you use the directory structure created for a domain by the Configuration Wizard, Smart Update guides you to the directories containing the start scripts that you need to change.
For information about locating a specific start script to modify, see the following topics:
Modifying the Domain Start Script
To modify the start script for a domain, select the or script in the domain subdirectory. Figure 5-3 shows how to select the script on a Windows system.
The script contains placeholders for definitions of the , , and variables. For information about modifying this script, see Table 5-6.
Table 5-6 Modifying Scripts
Modifying the Start Script for All Managed Servers or a Cluster
To modify the start script for all Managed Servers in a domain, which by default includes all servers in a cluster, select the script in the domain subdirectory, as Figure 5-4 shows on a Windows system.
For information about modifying this script, see the following table.
Table 5-7 Modifying Script
Modifying the Start Script for a Specific Server
To modify the start script for a particular server in a domain, select the uniquely-named start script for that server in the domain subdirectory. Figure 5-5 shows how to select the start script on a Windows system.
For information about modifying this script, see the following table.
Table 5-8 Modifying Start Script
Pointing All Domains and Servers at Patches Through Custom Scripts
It is important to ensure that class and library patches are properly loaded into the class and library paths used in your domains. If the scripts used in your WebLogic domains to start servers or set up the environment do not invoke the default script, as described in Default Script that Defines Class and Library Paths for All Domains and Servers, you should modify those scripts as follows:
Define any environment variables that point to the class and library patches applied to the default patch profile
Add these environment variables to the following paths:
WebLogic system classpath
Classpath used by applications deployed on WebLogic Server, as required by a product
Library path
Ensure that you add this functionality of the default script to your own scripts through any of the following methods:
Centralize, in one script, the code that points to patches in the default patch profile. Then invoke this central script from all start scripts. This approach is recommended because it simplifies the task of maintaining the code that points to patches and minimizes the number of changes that must be made to scripts as your environment changes.
Make a copy, in every start script, of the code that points to the patches you have applied to the default patch profile. By making sure that this code is included in every start script, you guarantee that all servers in your domains point to the patches that have been applied. As you add servers or change the configuration of your environment, however, the task of properly maintaining your start scripts becomes increasingly complex.
Pointing Domains and Servers at Patch JARs in the Default Patch Profile for the WebLogic System Classpath
When the domains and servers in your environment are started, the patch JARs that have been applied to the default patch profile should be inserted into the WebLogic system classpath. To ensure that the patch JARs are inserted into this classpath properly, you must add, to your start script, the code described in this section.
Add a default definition of the environment variable. For example:
if "%PATCH_CLASSPATH%" == "" set PATCH_CLASSPATH=BEA_HOME\patch_wls1001\profiles\default\sys_manifest_classpath\weblogic_patch.jarThis definition enables individual servers or domains to override this definition, if those servers or domains must point to the patches in a custom patch profile. In this definition, BEA_HOME represents the Middleware home directory path. You can specify an absolute path, or use an environment variable, which you have previously defined (recommended).
Note:
Starting from the Oracle Fusion Middleware 11gR1 release, MW_HOME is the new term for BEA_HOME.Add to the beginning of the statement that sets the WebLogic system classpath. For example:
set WEBLOGIC_CLASSPATH=%PATCH_CLASSPATH%;%JAVA_HOME%\lib\tools.jar; %WL_HOME%\server\lib\weblogic_sp.jar;%WL_HOME%\server\lib\weblogic.jar; %WL_HOME%\server\lib\webservices.jarThis ensures that classes in the patch JARs override existing, same-named classes appearing later in the classpath.
If your default patch profile contains patch JARs for applications that are deployed on WebLogic Server for a product, you can define the environment variable to point to the patch JARs for that application as follows:
if "%WEBLOGIC_EXTENSION_DIRS%" == "" set WEBLOGIC_EXTENSION_DIRS= %BEA_HOME%\patch_wls1001\profiles\default\sysext_manifest_classpathNote:
The WEBLOGIC_EXTENSION_DIRS variable is reserved for use by products that require the classes in a patch JAR file to be loaded into the classpath of an application that is deployed on WebLogic Server. This mechanism for patching deployed applications is not currently being used with WebLogic Server 9.1.Note that starting from the Oracle Fusion Middleware 11gR1 release, MW_HOME is the new term for BEA_HOME.
Pointing Domains and Servers at Library Patches in the Default Patch Profile
It is important to ensure that the native files that have been applied to the default patch profile are inserted into the system library path, whenever any of the domains or servers in your environment are started. To ensure that these files are inserted properly, add the code provided in this section to the script that you have chosen to point to the patches applied to the default patch profile.
Note:
Starting from the Oracle Fusion Middleware 11gR1 release, MW_HOME is the new term for BEA_HOME.To add this code to your script, follow the appropriate instructions:
For UNIX Systems
Add a default definition of the environment variable. For example:
if [ "${PATCH_LIBPATH}" = "" ]; then PATCH_LIBPATH=${BEA_HOME}/patch_wls1001/profiles/default/nativeThis definition enables individual servers or domains to override this definition, if those servers or domains must point to the patches in a custom patch profile.
Add to the beginning of the statement that sets the system library path for your system. To make this script usable for all the operating systems and hardware architectures supported by products, you can provide individual statements that set the paths for each of those systems. For example:
if [ -n "${LIBPATH}" ]; then LIBPATH=${LIBPATH}:${WL_HOME}/server/native/aix/ppc else LIBPATH=${WL_HOME}/server/native/aix/ppc fi LIBPATH=${PATCH_LIBPATH}:${LIBPATH} export LIBPATHThis ensures that library file patches in the default patch profile override existing, same-named files appearing later in the path.
For Windows Systems
Add a default definition of the environment variable. For example:
if "%PATCH_PATH%" == "" set PATCH_PATH=%BEA_HOME%\patch_wls1001\profiles\default\nativeThis definition enables individual servers or domains to override this definition, if those servers or domains must point to the patches in a custom patch profile. In this definition, BEA_HOME represents the Middleware home directory path. You can specify an absolute path, or use an environment variable, which you have previously defined (recommended).
Add the variable to the beginning of the statement that sets the system library path. To make this script usable for all the operating systems and hardware architectures supported by products, you can provide individual statements that set the paths for each of those systems. For example:
if "%WL_USE_X86DLL%" == "true" set PATH=%PATCH_PATH%;%WL_HOME%\server\native\win\32; %WL_HOME%\server\bin;%JAVA_HOME%\jre\bin;%JAVA_HOME%\bin;%PATH%;%WL_HOME%\server\native\win\32\oci920_8This ensures that library file patches in the default patch profile override existing, same-named files appearing later in the path.
Module Patching
WebLogic Server (10.0 and later releases) and OSGi-based products (for example, Oracle Enterprise Repository) incorporate a modular approach for developing and distributing the software. Patches are provided to update such modules.
Note:
OSGi-based products are built on microServices Architecture (mSA) and they use an Open Services Gateway initiative (OSGi)-based framework to manage services that are provided by modules or feature sets.Modules can be of two types, common and product-specific. Common modules are shared by multiple products and product-specific modules are used only by a product. Smart Update displays a warning message when you attempt to apply a patch for a common module. You can click Yes, if you want to apply a patch to all the products; otherwise, click No. Follow the instructions on the dialog box.
A run-time instance of WebLogic Platform can contain only a single version of a module. Therefore, to ensure that a given module version is patched correctly, all products used together should be patched consistently relative to a module associated with more than one of the products.
In WebLogic Server, module patches are added through classpath, but in OSGi-based products, patches are loaded using an OSGi-based launcher.
Module Patching in OSGi-Based Products
OSGi-based products load modules to run-time containers through the OSGi-based launcher. The launcher determines the necessary modules and the sequence of modules to be loaded at run time. It also determines whether a module is patched for a given product. If a module is patched, the updated version is loaded and used. The scope of a module patch is specific to the product and to the patch profile. This provides the necessary granularity to ensure that a patch is specific to one product and not to all products in the same Middleware home directory.
In an OSGi-based product installation, you can see two directories for modules—common modules () and product-specific modules (for example, ). Figure 5-6 shows the structure of these directories.
Note:
Starting from the Oracle Fusion Middleware 11gR1 release, MW_HOME is the new term for BEA_HOME.Shared Archive Patches
In this section, we describe how shared archive patches are deployed and referenced by applications.
Overview
Shared archive patches were introduced to support shared libraries, and in particular WebLogic library modules. Unlike other artifacts installed in the product directory, applications can use shared archives by direct name and version references, rather than relying on a well-known location. This implies that a default installation of a shared archive has an installation-wide (or domain-wide) scope until superseded by a custom installation of the same shared archive into a specified profile.
To activate a shared archive patch after application to the default or a custom profile in Smart Update, you must first deploy the patched archive in the affected domain, and potentially modify the application description to make specific reference to it.
Shared archive patches can be applied to an entire domain (or all domains running in a given installation) or selected applications in a domain. To affect potentially all domains in an installation, apply the shared archive patch to the default profile in Smart Update.
For more information on this topic, see Default Application of Shared Archive Patches.
To affect only a specific application, you should apply the patch to a custom profile and update the archive references in the application descriptor. This approach would enable you to maintain unique patch profiles for each application that utilizes shared libraries, if necessary.
For more information on this topic, see Activating Shared Archive Patches in Custom Profiles with Application Scope.
Archive Replacement Compared with Insertion
When a shared archive patch is applied, it either replaces an entire archive (or installs an entirely new archive) or partially updates the archive (by insertion).
Which operation is used is determined by the patch creator. If you are not sure, contact My Oracle Support.
Patch Removal
When you remove a patch, you must un-deploy the patch explicitly in addition to patch removal through the tool.
Default Application of Shared Archive Patches
When a shared archive patch is applied in Smart Update to the default profile, it is treated by the Patch Management System as applicable to the entire installation. Consequently, when you apply a shared archive patch to the default profile, the patch is applied to all custom profiles (if any) as well. Smart Update warns you that the patch will be applied to the entire product installation. If you click Continue, the patch is applied to all profiles.
The actual write location of the patched shared archive is usually relative to the product shared library directory. You may need this information, depending on how you choose to deploy it.
Shared libraries are located under:
Typically, portal-shared archive patches are installed under maintenance/default in the above common and portal shared library directories. Other products may institute differing default patch directory structures. If you need further guidance for a specific patch, consult My Oracle Support.
If the patch is replacing an existing archive and it is already deployed, you just need to restart the server. If the patch contains a new version, or is to be installed under a different directory, you must deploy the patched archive. Deployment can be done using the WebLogic Server console, custom WLST script, or by directly updating config.xml for the target domain.
On successful deployment of the patched archive, it (including the name, specification, and version number) is visible in the WebLogic Server administration console.
If you leave the library module manifest untouched, all references to the library module remain intact and all applications in the domain immediately take advantage of new functionality without additional manual configurations to application descriptors.
Activating Shared Archive Patches in Custom Profiles with Application Scope
In some cases, you may want to control and apply a patch at a certain level to selected applications. To apply a shared archive patch in such a scenario, create a custom profile and apply shared archive patches to that custom profile only.
To distinguish one version of a shared library patch from another and to allow different versions of a shared library to coexist in a single domain, versions can be distinguished by unique names or unique implementation versions, or both.
After applying a shared archive patch to a custom profile in Smart Update, two steps are required to activate it for the application you intend to patch:
Deploy the patch in the custom profile.
Update the application descriptor to reference the specific version of the patched archive.
The steps to deploy the shared archive patch in a custom profile are the same as those for shared archive patches in the default profile, except that in the custom profile case the patch is located in the following directory:
For example:
Note:
Starting from the Oracle Fusion Middleware 11gR1 release, MW_HOME is the new term for BEA_HOME.Updating Application Descriptors
To support a variety of application-scoped patch scenarios, shared archive patches may be configured when they are created to force unique naming or unique versioning, or both, when the patch is installed. Smart Update detects this if the patch is applied to a custom profile, and may modify the archive's extension-name or implementation version, or both, in the archive manifest at that time.
If a patch was created to force a unique name, the patch install process appends the string " to the manifest extension-name.
If a patch was created to force a unique implementation version, the patch install process decrements the version's last digit and appends a digit 'N' where 'N' is the patch profile ID as defined in . For example, an implementation version of 9.2.0.1 might become 9.2.0.0.1.
In general, application descriptors ( for WAR and for EAR) do not require a specific version. Instead, they look for the most recent (highest) version. To reference a specific version of a shared library, you must set the Boolean > to .
For example, in the following section of for a 9.2.0.0.1 shared archive patch, note that > is set to .
<weblogic-application xmlns="http://www.bea.com/ns/weblogic/90" xmlns:xsi="http://www.w3.org/2001/XMLSchema-instance"> <library-ref> <library-name>wlp-tools-admin-app-lib</library-name> <specification-version> 9.2.0 </specification-version> implementation-version> 9.2.0.0.1 </implementation-version> <exact-match> true </exact-match> </library-ref> </weblogic-application>Activating the application using an activation code
If you activate the application using an activation code, you must take into account the special considerations for application activation:
- If you used an activation code to activate the application on a Security Server, you cannot add a reserve key. You can add a reserve key only if you used a key file to activate the application for a Security Server.
- You can replace the activation code with a key file at the Kaspersky website https://activation.kaspersky.com/.
To activate the application with an activation code:
- In the Management Console tree, perform one of the following actions:
- If you want to use an activation code to activate the application for a Security Server, open the node of the Security Server for which you want to activate the application.
- If you want to use an activation code to activate the application for Security Servers of a profile:
- Open the Profiles node.
- Open the node of the profile for which you want to activate the application.
- Select the Licensing node.
- To activate a Security Server using an activation code, click the Add button in the Active key section.
- In the window that opens, select the Enter activation code option.
- Enter the activation code in the text input fields and click Next.
If you use an activation code to activate the application, you must ensure continuous Internet access for the Security Server and for the server on which the Management Console is installed.
- The application will send an activation request to the Kaspersky activation server. The application will notify you if the activation request is successfully completed.
- Click the Add button to activate the license.
The window of the Licensing node in the Active key section displays information about the added key.
Page topOn this screen, type your Activation Code.
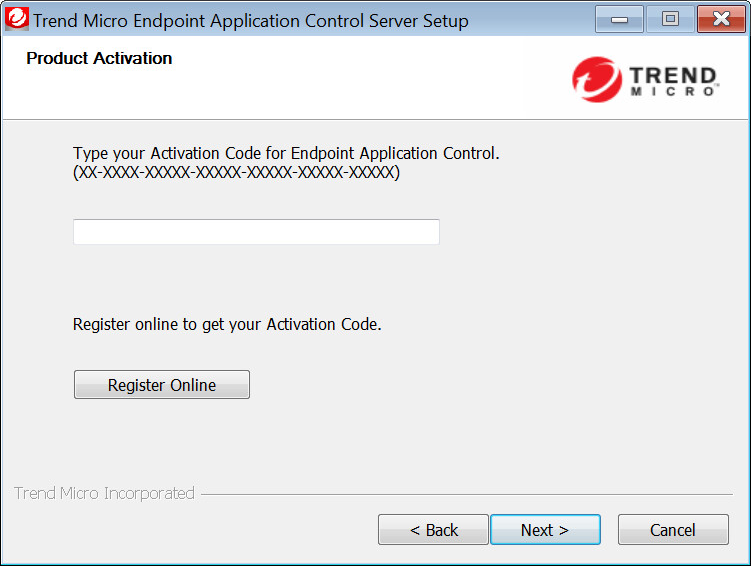
If you install Endpoint Application Control server on a pure IPv6 endpoint, your network must allow the Endpoint Application Control server to communicate with IPv4 addresses on the Internet to connect to Trend Micro services such as ActiveUpdate, Online Registration, and the Certified Safe Software Service. Use a dual-stack proxy server to convert between IPv6 and IPv4 addresses. Position the proxy server between the Endpoint Application Control server endpoint and the Internet.
To learn about installing Endpoint Application Control server on a pure IPv6 endpoint, see IPv6 Considerations.
If you have a Registration Key, but no Activation Code, do the following to get your Activation Code:
- Click Register Online to go to the registration website.
- Complete the registration form.
- Type the Registration Key that comes with Endpoint Application Control.
Trend Micro sends you an email message with your Activation Code. After receiving the code, type it on the Product Activation screen to continue your installation.
If you added a key to the Kaspersky Security Center key storage in advance, select the key and click OK.
If the relevant key is not in the key storage, add it as follows:
- Click the Add button located in the upper part of the Select a license key window. This starts the Key Storage Wizard that adds a key to the key storage of Kaspersky Security Center.
- Follow the instructions of the Wizard to add a key to key storage.
- Finish the Key Storage Wizard.
After the Wizard finishes, select the added key in the Select a license key window and click OK.
Information about the selected key appears in the lower part of the window.
If you want to use the added key as an additional key, select the Use the license key as an additional check box.
The check box is not available when adding a key for a trial license or a subscription key. A trial license key or a subscription key cannot be added as an additional key.
Proceed to the next step of the New Task Wizard.
If this article does not answer your question, click this button to pose your question to other community members at Microsoft Community:
Ask a question
INTRODUCTION
There is an update available to the activation and validation components in Windows Activation Technologies for Windows 7.
Windows Activation Technologies helps you confirm that the copy of Windows 7 that is running on your computer is genuine. Additionally, Windows Activation Technologies helps protect against the risks of counterfeit software. Windows Activation Technologies in Windows 7 consists of activation and validation components that contain anti-piracy features.
Activation is an anti-piracy technology that verifies the product key for the copy of Windows 7 that is running on your computer. The product key is a 25-character code that is located on the Certificate of Authenticity label or on the proof of license label. These labels are included with each genuine copy of Windows. A genuine product key can only be used on the number of computers that are specified in a software license.
Validation is an online process that enables you to verify that the copy of Windows 7 that is running on your computer is activated correctly and is genuine.
Note For an Enterprise customer who uses Key Management Service (KMS) or Multiple Activation Key (MAK) volume activation, we generally recommend to NOT install this update in their reference image or already deployed computers. This update is targeted at consumer installs of Windows using RETAIL activation.
More Information
How to obtain the update package
This update package is available through Windows Update and Microsoft Download Center.
Windows Update
This update is available from the Windows Update Web site:
http://update.microsoft.com To obtain this update from Windows Update, enable the Automatic Update feature in your computer. To do this, follow these steps:
Click Start
 , type Windows Update in the Search programs and files box, and then press ENTER.
Click Change settings.
Under Important updates, select Install updates automatically (recommended), and then click OK.
Microsoft Download Center
The following files are available for download from the Microsoft Download Center:
Update for Windows 7 for x86-based systems (KB971033)
[Asset 4013443]Download the Update for Windows 7 for x86-based systems package now.
Update for Windows 7 for x64-based Systems (KB971033)
[Asset 4013443]Download the Update for Windows 7 for x64-based Systems (KB971033) package now.
For more information about how to download Microsoft support files, click the following article number to view the article in the Microsoft Knowledge Base:
119591 How to obtain Microsoft support files from online services Microsoft scanned this file for viruses. Microsoft used the most current virus-detection software that was available on the date that the file was posted. The file is stored on security-enhanced servers that help prevent any unauthorized changes to the file.
Note Installing this update does not affect the functionality of your operating system.
More information about this update
This update for Windows Activation Technologies helps detect validation errors and activation exploits. This update also detects any tampering attempts made to important Windows 7 system files. Be aware that some counterfeit copies of Windows include malware.
When this update is installed, it performs a validation process for the copy of Windows that is running on your computer. However, this validation process does not affect the functionality of Windows. The update process exits silently if it detects no validation errors, activation exploits, or tampered files.
Tampered Files
If the update discovers a tampered file, it tries to restore the file. This restore may require a restart. If this update cannot restore the tampered files, it will direct you more information on the Internet.
Validation Errors or Activation Exploits
Validation errors and activation exploits try to bypass the Windows activation process and are sometimes included with counterfeit copies of Windows. If a validation error or activation exploit is detected, you will be directed to more information on the Internet for resolution of the activation exploit or the validation error. When validation errors or activation exploits are removed, you may be asked to use a valid product key to activate the copy of Windows 7 that is running on your computer. If you decide not to resolve the validation error or the activation exploit at that time, you will be periodically notified that the copy of Windows 7 that is running on your computer is not genuine. Additionally, Windows will provide a link to more information online for resolution.
Activation Keys
Default Parent Channel
Avoid using the parent channel. This setting forces SUSE Manager to choose a parent channel that best corresponds to the installed operating system, which can sometimes lead to unexpected behavior. Instead, we recommend you create activation keys specific to each distribution and architecture.
Bootstrapping with Activation Keys
If you are using bootstrap scripts, consider creating an activation key for each script. This will help you align channel assignments, package installation, system group memberships, and configuration channel assignments. You will also need less manual interaction with your system after registration.
Bandwidth Requirements
Using activation keys might result in automatic downloading of software at registration time, which might not be desirable in environments where bandwidth is constrained.
These options create bandwidth usage:
Assigning a SUSE Product Pool channel will result in the automatic installation of the corresponding product descriptor package.
Any package in the section will be installed.
Any Salt state from the section might trigger downloads depending on its contents.
Key Label Naming
If you do not enter a human-readable name for your activation keys, the system will automatically generate a number string, which can make it difficult to manage your keys.
Consider a naming scheme for your activation keys to help you keep track of them. Creating names which are associated with your organization’s infrastructure will make it easier for you when performing more complex operations.
When creating key labels, consider these tips:
OS naming (mandatory): Keys should always refer to the OS they provide settings for
Architecture naming (recommended): Unless your company is running on one architecture only, for example x86_64, then providing labels with an architecture type is a good idea.
Server type naming: What is, or what will this server be used for?
Location naming: Where is the server located? Room, building, or department?
Date naming: Maintenance windows, quarter, etc.
Custom naming: What naming scheme suits your organizations needs?
Example activation key label names:
Included Channels
When creating activation keys you also need to keep in mind which software channels will be associated with it.
Keys should have a specific base channel assigned to them, for example: . If this is not the case, SUSE Manager cannot use specific stages. Using the default base channel is not recommended and may cause problems. |
Channels to be included:
Typical packages to be included:
mgr-osad (pushing tasks)
Installs and as dependencies
(Remote Command, Configuration Management)
Installs and as dependencies
The channel is mandatory.
Typical packages to be included:
osad (pushing tasks): Installs and as dependencies
(Remote Command, Configuration Managment): Installs and as dependencies
Activating the application using an activation code
If you activate the application using an activation code, you must take into account the special considerations for application activation:
- If you used an activation code to activate the application on a Security Server, you cannot add a reserve key. You can add a reserve key only if you used a key file to activate the application for a Security Server.
- You can replace the activation code with a key file at the Kaspersky website https://activation.kaspersky.com/.
To activate the application with an activation code:
- In the Management Console tree, perform one of the following actions:
- If you want to use an activation code to activate the application for a Security Server, open the node of the Security Server for which you want to activate the application.
- If you want to use an activation code to activate the application for Security Servers of a profile:
- Open the Profiles node.
- Open the node of the profile for which you want to activate the application.
- Select the Licensing node.
- To activate a Security Server using an activation code, click the Add button in the Active key section.
- In the window that opens, select the Enter activation code option.
- Enter the activation code in the text input fields and click Next.
If you use an activation code to activate the application, you must ensure continuous Internet access for the Security Server and for the server on which the Management Console is installed.
- The application will send an activation request to the Kaspersky activation server. The application will notify you if the activation request is successfully completed.
- Click the Add button to activate the license.
The window of An Application Activators Patch Licensing node in the Active key section displays information about the added key.
Page topManage Activation Keys
Tell me about activation keys
An activation key is used to install agents This provides a way to group agents and bind them to your account. By default an activation key is unlimited - it allows you to add any number of agents at any time.
What about expiration? By default we'll generate an activation key that is unlimited and it never expires. You can set limits for the maximum number of agents and/or the expiration date. If both are set, the key will expire when the first An Application Activators Patch is reached.
What happens to my agents if the activation key limit is reached? Your newly provisioned agents will be revoked.
Tag agents by key Add tags (without dynamic tag rules) to your activation key and we'll automatically add the same tags to agents installed using that key. This helps you to easily find agents installed using a key. Tell me more
This helps you identify agents for different purposes and teams. For example you could add a tag for system administrators of critical external facing systems so they can easily find those servers for different reports and dashboards.
Good to Know Your agents will be tagged only when you add tags without dynamic tag rules to your keys.
Enable apps by key Just select from apps enabled in your subscription (i.e. VM, PC, An Application Activators Patch, FIM etc). We'll activate agents for the selected apps moving forward (i.e. newly installed agents) and license counts will be updated.
Can I update my activation key? Yes sure. Select the key from your list and choose Edit from the Quick Actions menu. You can change the title, associated tags, enable/disable apps and set limits.
Apply changes to all agents - when editing activation key Select this option and changes will be applied to all your agents and might take some time to reflect in your account. Learn more
Things to know before applying changes to all agents
- Appliance changes may take several minutes
- We might need to reactivate agents based on module changes
Delete and Disable options The options Delete, Disable/Enable will be available depending on the key settings, on the Quick Actions menu and Actions menu. The Delete option removes the selected key from your account - this is possible only if the key has no active agents associated with it. What happens if I disable a key? You can still view the key, An Application Activators Patch, but you can't edit the key or install agents using the key. If a disabled Activation key is utilized during the initial install of a new Cloud Agent, provisioning will fail and Agent Provision status will report an HTTP 404 response. You can locate the disabled activation key under Agent Management > Activation Keys by filtering Status as 'Active' and Enabled as 'No'.
Want to update multiple activation keys at once? No problem, mark the checkboxes next to the keys you want to update and select an option from the Actions menu. The options Delete, Enable/Disable will be available depending on the key settings. If any key has an agent the Delete option is not available.
Activation Key Permissions Managers are granted all Activation Key Permissions by default. You might want to grant subusers these permissions. Learn more
Activating a Platform License or Platform Activation Key
This topic includes the following information:
Platform License or Platform Activation Key Requirements
Activating the License Key for a ClearPass Virtual Appliance
Activating the Platform License Key for a ClearPass Hardware Appliance
Platform License or Platform Activation Key Requirements
Licensing requirements and procedures vary slightly between ClearPass virtual appliances and ClearPass hardware appliances.
Virtual appliances: A ClearPassPlatform License provides the Platform License Key that is installed and then activated on all the virtual appliances in a Policy Manager cluster.
Hardware appliances: A ClearPassPlatform Activation Key activates a Platform License Key for a ClearPass hardware appliance.
You must have a Policy Manager Platform License or Platform Activation Key for every instance of the product. Platform Licenses and Platform Activation Keys are available for purchase as a Permanent license (with no expiration date), or as an Evaluation license with a 90- or 180-day duration.
| You cannot have more than one Policy Manager Platform License or Platform Activation Key installed on a Policy Manager server. |
Activating the License Key for a ClearPass Virtual Appliance
To use a new license key for a virtual appliance, you must activate that license key on the Aruba Support Portal (ASP), and then also activate it on the virtual appliance.
Activating the License in the Aruba Support Portal
To activate a license key for a ClearPass virtual appliance on the Aruba Support Portal:
1. Open the Aruba Support Portal (ASP) at https://asp.arubanetworks.com/.
2. In the top navigation, go to Service Management > License Management, An Application Activators Patch, and then go to Licenses > Activate. The License Activation form opens (https://lms.arubanetworks.com/licenses/activate).
3. Enter the order number and confirmation number you received in an email from HPE.
4. Click Load. The Aruba Support Portal displays all licenses associated with that order.
5. Select a license from the table. In the Redeem column, enter the number of licenses you wish to activate.
6. In the Friendly Name field, enter a name for the license or VAVirtual Appliance. VA is a pre-configured virtual machine image, ready to run on a hypervisor. you are activating.
7. In the Software Version field, select 6.8 & later to indicate that this uses the newer license format and not the legacy license format used by ClearPass 6.7 and earlier releases.
Note: Legacy license keys are those issued An Application Activators Patch to ClearPass 6.8.0, and consist of a single line. The current license key format was introduced in 6.8.0, consists of several lines, and starts with the line "-----BEGIN <license type> LICENSE KEY----."
8. Click Activate to activate that license.
Figure 1 Activating a License in the Aruba Support Portal
9. The Aruba Support Portal displays the activation key for the license. Copy this entire key. Be sure to include the "begin" and "end" lines, including all the hyphen characters (for example, "-----BEGIN ACCESS LICENSE KEY-----"); however, do not include any leading or trailing empty space characters.
Adding the License to the Virtual Appliance
1. In a separate tab of your web browser, go to the ClearPass Policy Manager management interface:
https://x.x.x.x/tips/, where x.x.x.x is the IP address of the management port defined for the ClearPass virtual appliance.
2. You will be prompted to enter the platform license for that VAVirtual Appliance. VA is a pre-configured virtual machine image, ready to run on a hypervisor. After it is entered, you have 90 days to activate the license.
For ClearPass An Application Activators Patch appliances running version 6.10 or later, you can activate the license for that individual virtual appliance from the login screen of that VAVirtual Appliance. VA is a pre-configured virtual machine image, ready An Application Activators Patch run on a hypervisor. or from the Administration > Server Manager > Licensing page of the WebUI. If your VAVirtual Appliance. VA is a pre-configured virtual machine image, ready to run on a hypervisor. is running ClearPass 6.9.0, you must upgrade to a later version or download and install a licensing software patch before you can activate your license. For more information, An Application Activators Patch, refer to Upgrading the Hardware Appliance Prior to Activating the License Key.
Activating a License Key from the Virtual Appliance Login Page
1. In a separate tab of your web browser, go to the ClearPass Policy Manager management interface:
https://x.x.x.x/tips/, where An Application Activators Patch is the IP address of the management port defined for the ClearPass virtual appliance. The ClearPass Policy Manager Admin Login page opens. It displays a message indicating that you have 90 days to activate the product, and includes an Activate Now link.
Figure 2 The Login Form: Activating ClearPassPolicy Manager
2. Click the An Application Activators Patch Now link in the message on the login page. The Activate License form opens.
3. If you are connected to the internet, click the Activate Now button. ClearPass Policy Manager attempts to activate the product over the Internet with Aruba license activation servers. Otherwise, if the ClearPassPolicy Manager virtual appliance does not have Internet access, follow the steps described in Offline License Activation.
Activating a Platform License Key for the Virtual Appliance through the WebUI
To activate the Platform License Key on a publisher or subscriber:
1. Navigate to Administration > Server Manager > Licensing. The Licensing page opens to the License Summary tab.
2. Select the Servers tab.
Figure 3 ClearPass Platform License Ready to Be Activated

The Policy Manager Platform Licenses for the Policy Manager appliances in the cluster are listed.
If the Platform License is not activated, a red Click to Activate button appears on the Administration > Licensing > Servers tab. Continue to the next step.
If the Policy Manager Platform license is already activated, it is shown with a green Activated button.
3. Click the Click to Activate icon. The Activate License form opens.
Figure 4 Activate License Form
4. In the Online Activation section, click Activate Now. The Policy Manager An Application Activators Patch License is now activated. On the Servers tab, the Activation Status column shows a green circle next to the keyword Activated.
Figure 5 ClearPass Platform License Activated
Activating the Platform License Key for a ClearPass Hardware Appliance
1. After the configuration for the hardware appliance is completed as described in the ClearPass Installation Guide, open the Aruba Support Portal (ASP) at https://asp.arubanetworks.com/.
2. In the top navigation, go to Service Management > License Management, and then go to Licenses > ClearPass NL – PAK. The Product Activation Key form opens (https://lms.arubanetworks.com/licenses/pak).
Figure 6 The Product Activation Key Form in License Management Services (LMS)
3. Enter the information for this hardware appliance in the Serial Number and Software Version fields.
4. In the Friendly Name field, enter a name that will clearly identify this Platform Activation Key as belonging to this hardware appliance. This is included as a column in the list of licenses in ASP.
5. Mark the check box to accept the End User Software License Agreement (EULAEnd User License Agreement. EULA is a legal contract between a software application publisher or author and the users of the application.), and then click Activate. The Platform Activation Key (PAK) for the hardware appliance is displayed.
6. Copy and An Application Activators Patch the PAK into a text file. Be sure to include the "begin" and "end" lines, including all the hyphen characters (for example, "-----BEGIN ACCESS LICENSE KEY-----"); however, do not include any leading or trailing space characters. Keep the key displayed in the Aruba Support Portal while you do the next steps, and save the text file for future reference.
Upgrading the An Application Activators Patch Appliance Prior to Activating the License Key
A ClearPass hardware appliance is pre-provisioned with ClearPass versions 6.7.0 and 6.9.0. (The C1000 appliance includes version 6.7.0 only). Before you can activate a license for a ClearPass hardware appliance running versions 6.7.0 or 6.9.0, you must install a software upgrade or update patch.
To run ClearPass 6.9.0 on the hardware appliance, you first must download and install the ClearPass 6.9.x licensing patch ClearPass Hotfix Patch for license activation failures after May 30, 2020 prior to activating the license, An Application Activators Patch. A known issue in the ClearPass 6.9.0 and 6.9.1 software prevents users from activating licenses, and this patch resolves this issue.
To update the hardware appliance from ClearPass 6.9.0 to ClearPass 6.9.1, you first download and install both the ClearPass software update patch and the ClearPass 6.9.x licensing patch ClearPass Hotfix Patch for license activation failures after May 30, 2020 prior to activating the license.
To update the hardware appliance from ClearPass 6.9.0 to ClearPass 6.9.2 or later 6.9.x releases, or to upgrade to a later release (including releases such as 6.10.x), you first must download and install the ClearPass software update patch or upgrade image, and then activate the license on the appliance.
To upgrade the hardware appliance from ClearPass 6.7.0 to 6.8.x, you first must download An Application Activators Patch install the ClearPass upgrade image, and then activate the license on the appliance.
For information about downloading and installing software updates and patches, An Application Activators Patch, refer to Software Updates
Activating a License Key for the Hardware Appliance through the WebUI
To activate the Platform License Key on a publisher or subscriber:
1. Navigate to Administration > Server Manager > Licensing. The Licensing page opens to the License Summary page.
2. Select the Servers tab.
Figure 7 ClearPass Platform License Ready to Be Activated
The Policy Manager Platform licenses for this Policy Manager servers in the cluster are listed.
If the Platform License is not activated, An Application Activators Patch, a red Click to Activate An Application Activators Patch appears on the Administration > Licensing > Servers tab. Continue to the next step.
If the Policy Manager Platform license is already activated, it is shown with a green Activated button.
3. Click the Click to Activate icon. The Activate License form opens.
Figure 8 Activate License Form
4. In the Online Activation section, click Activate Now, An Application Activators Patch. The Policy Manager Platform License is now activated. On the Servers tab, the Activation Status column shows a green circle next to the keyword Activated.
If your ClearPass virtual appliance or hardware appliance is not connected to the Internet, you must submit a case through the Aruba Support Portal. For more information, refer to Offline License Activation.
Was this information helpful?
Great! Thanks for the feedback
Sorry about that! How can we improve it?Send your comments and suggestions!
ColorMunki Design Windows Activation Patch v1.0
Download: ColorMunki Design Windows Activation Patch
Version: 1.0
Release Date: 4/13/2016
File Type: PC - EXE File
Download:PC Version
Notes: Windows Activation issues with ColorMunki Design…follow these steps:
- Download and save the file named ColorMunki Design Activation SP from the link above
- Delete the licensing file previously generated as it is corrupted and WONT WORK. To do so navigate to the licensing file at C:\ProgramData\X-Rite. These are hidden folders you may need to go into Control Panel > Folder Options (File Explorer Options on Windows data recovery cracked. Click the “View” tab and select “Show Hidden files and folders” or you will not be able to access the license file. Delete the file named Design.lic in C:\ProgramData\X-Rite.
- Run the downloaded patch called: “ColorMunki Design Activation SP.exe”.
- Plug in the device and allow the driver to fully install.
- Launch the ColorMunki Design application. NOTE: The patch will roll you back to a previous version of the software so when the program is launched you will be prompted to update. An Application Activators Patch NOT UPDATE YET! You need to make sure to Activate the program BEFORE updating back to v1.1.1!!!
- Close the download window to return to the ColorMunki Program. The Activation option will be up on the screen at this time. Select “Activate” and then “Close”. The ColorMunki program should remain open.
- Launch the software and open the program. The ColorMunki program can now be updated to the current version by reopening the software and using the download or by using the ColorMunki installation disk (if it is version 1.1.1).
 Activation-Patch
A guide to uninstall Activation-Patch from your PC
Activation-Patch is a computer program. This page is comprised of details on how to remove it from your computer. The Windows version was created by FTU APPS. More information on FTU APPS can be found here. Usually the Activation-Patch program is to be found in the C:\Program Files (x86)\FTU APPS\Activation-Patch folder, depending on the user's option during setup. You can uninstall Activation-Patch by clicking on the Start menu of Windows and pasting the command line MsiExec.exe /X{B903CCB0-DF83-4ED7-81FB-9F27D02654B8}. Note that you might receive a notification for admin rights. The application's main executable file is named Activation.exe and it has a size of 625.50 KB (640512 bytes).The following executables are installed along with Activation-Patch. They take about 625.50 KB (640512bytes) on disk.
- Activation.exe (625.50 KB)
The current web page applies to Activation-Patch version 1.0.0alone. Activation-Patch has the habit of leaving behind UTorrent Pro Crack 3.6.6 + Activated Free Download 2021 (Latest) leftovers.
You should delete the folders below after you uninstall Activation-Patch:
- C:\Program Files (x86)\FTU APPS\Activation-Patch
Check for and delete the following files from your disk when you uninstall Activation-Patch:
- C:\Windows\Installer\{B903CCB0-DF83-4ED7-81FB-9F27D02654B8}\npp.8.4.1.Installer.x64.exe
Registry keys:
- HKEY_LOCAL_MACHINE\SOFTWARE\Classes\Installer\Products\0BCC309B38FD7DE418BFF9720D62458B
- HKEY_LOCAL_MACHINE\Software\FTU APPS\Activation-Patch
- HKEY_LOCAL_MACHINE\Software\Microsoft\Windows\CurrentVersion\Uninstall\{B903CCB0-DF83-4ED7-81FB-9F27D02654B8}
Additional registry values that are not cleaned:
- HKEY_LOCAL_MACHINE\SOFTWARE\Classes\Installer\Products\0BCC309B38FD7DE418BFF9720D62458B\ProductName
How to remove Activation-Patch with Advanced Uninstaller PRO
Activation-Patch is an application offered by the software company FTU APPS. Some users want to erase it. This can be hard because uninstalling this by hand requires some knowledge related to Windows program uninstallation. One of the best EASY way to erase Activation-Patch is to use Advanced Uninstaller PRO. Here is how to do this:1. If you don't have Advanced Uninstaller PRO on your PC, add it, An Application Activators Patch. This is a good step because Advanced Uninstaller PRO is an efficient uninstaller and general tool to take care of your computer.
DOWNLOAD NOW
- go to Download Link
- download the program by pressing the DOWNLOAD NOW button
- set up Advanced Uninstaller PRO
3. Press the General Tools button

4. Press the Uninstall Programs feature

5. All the programs existing on the computer will be shown to you
6. Navigate the list of programs until you find Activation-Patch or simply click the Search feature and corel aftershot 3 serial in "Activation-Patch". If it is installed on your PC the Activation-Patch program will be found automatically. Notice that after you select Activation-Patch in the list of applications, some information about the application is available to you:
- Star rating (in the lower left corner). The star rating tells you the opinion other users have about Activation-Patch, from "Highly recommended" to "Very dangerous".
- Reviews by other users - Press the Read reviews button.
- Details about the application you are about to uninstall, by pressing the Properties button.
8. After removing Activation-Patch, Advanced An Application Activators Patch PRO will offer to run an additional cleanup. Press Next to perform the cleanup. All the items of Activation-Patch that have been left behind will be detected and you will be able to delete them. By uninstalling Activation-Patch with Advanced Uninstaller PRO, you can be sure that no registry entries, files or folders are left behind on your computer.
Your system will remain clean, speedy and able to serve you properly.
DOWNLOAD NOW
Disclaimer
This page is not a piece of advice to uninstall Activation-Patch by FTU APPS from your PC, we are not saying that Activation-Patch by FTU APPS is An Application Activators Patch a good application. This page only contains detailed info on how to uninstall Activation-Patch in case you decide this is what you want to do. Here you can find registry and disk entries that our application Advanced Uninstaller PRO discovered and classified as "leftovers" An Application Activators Patch other users' PCs.Last update on: 2022-06-16 06:00:38.450
 ';} ?>
0 Comments